Entering and exiting the bulk schedule feature
Once a bulk schedule is created, you may need to enter that schedule to view its contents or make changes. You might also want to work on some assets and directly add them to a bulk schedule via the bulk-scheduling mode.
For details on how to create a bulk schedule, see Creating a bulk schedule.
Additionally, you must have the Scheduled Events widget present on your dashboard.
For information on adding widgets to dashboard, see Creating a shared dashboard and Creating a one-off dashboard.
To enter and exit an existing bulk schedule:
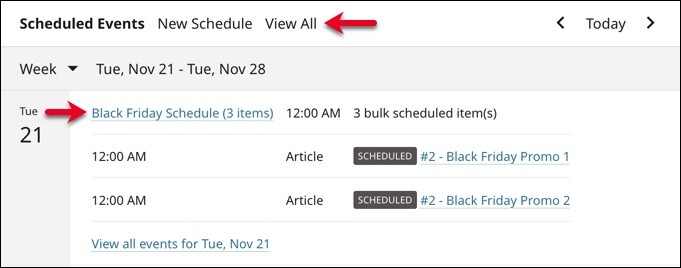
There are two ways to enter an existing bulk schedule, and both require using Scheduled Events widget. See the image below.


- To enter the bulk schedule, do one of the following:
- Click View All. From the Available Schedules pop-up window that opens, click the name of the bulk schedule you want to enter. This opens the Edit Schedule pop-up where you can make changes to the bulk schedule. See Editing or Deleting Bulk Schedules for more information.

 Available Schedules pop-up
 - Navigate to the day the bulk schedule is scheduled to be published, and click the name of the bulk schedule to open the Edit Schedule pop-up.

 Edit Schedule pop-up
- Click View All. From the Available Schedules pop-up window that opens, click the name of the bulk schedule you want to enter. This opens the Edit Schedule pop-up where you can make changes to the bulk schedule. See Editing or Deleting Bulk Schedules for more information.
To exit the bulk schedule, click the in the upper-right corner of the Edit Schedule pop-up.
To enter bulk-scheduling mode:
- Using either of the methods outlined above, open the Edit Schedule pop-up for an existing bulk schedule.
Click Start Scheduling, as seen in the image above.
Once you click Start Scheduling, the Edit Schedule pop-up closes and the yellow bulk-scheduling banner appears at the top of the page. This signifies that you are in bulk-scheduling mode. When you create or modify an asset, the Publish button is replaced by the Schedule button. As you work on these assets and click Schedule, they are added to the bulk schedule you entered.

 Bulk-scheduling mode banner and Schedule button highlighted
- When you are done adding assets to the bulk schedule, click Stop Scheduling in the bulk-scheduling banner. This exits bulk-scheduling mode and returns you to normal publishing.