Tutorial: Creating and expanding access for a GraphQL endpoint inside of Brightspot
In this tutorial, you will create a restricted GraphQL endpoint inside of Brightspot, and then gradually expand its access. Though you will be working with a GraphQL delivery API endpoint, the principles outlined in this tutorial apply to management API endpoints as well. As part of the effort, you will complete the following steps:
- Complete a prerequisite step of creating two articles, each owned by a different site.
- Create a GraphQL endpoint that restricts access to only those clients with an API key.
- Expand access to the endpoint, but maintain some restrictions on the site from which you can fetch articles.
- Open access to the endpoint completely.
- View analytics related to the endpoint.
Assumptions
This tutorial assumes the following:
- Familiarity with GraphQL
- Familiarity with Cross-Origin Resource Sharing (CORS)
- Familiarity with the editorial process of creating an article in Brightspot
- A Brightspot environment that includes more than one site
Step 1: Creating prerequisite articles in Brightspot
To begin, create two articles in Brightspot, each owned by a different site. These articles will be referenced in validation steps later in this tutorial.
Creating the first article in site A
- In the header, click .
- From the Create list, select Article.
- In the Headline field, enter
GraphQL-related article 1. - Click Publish.
- In your browser's URL field, copy the article's UUID from the URL query string (found after
id=parameter), then save this value for later.
Navigating to site B and creating the second article
- Click the site name in the right side of the header.
- Select site B.
- In the header, click .
- From the Create list, select Article.
- In the Headline field, enter
GraphQL-related article 2. - Click Publish.
- In your browser's URL field, copy the article's UUID from the URL query string (found after
id=parameter), then save this value for later.
You now have two articles that you will use in validation steps as you build and re-configure a GraphQL endpoint.
Step 2: Creating a basic GraphQL API endpoint that requires an API key
In this step, you will create a basic GraphQL endpoint that requires an API key.
As part of this effort, you will:
- Use the Brightspot user interface to create a new GraphQL API endpoint
- Familiarize yourself with the basics of creating an endpoint
- Configure schema settings
- Require an API key to access to the endpoint
- Query the endpoint and validate that it is working correctly using the Brightspot user interface
Accessing the Brightspot API user interface and creating a new endpoint
In this step, you will initiate the creation of a GraphQL delivery API endpoint in Brightspot.
- Ensure you are logged into Brightspot.
- Click > Admin > APIs.
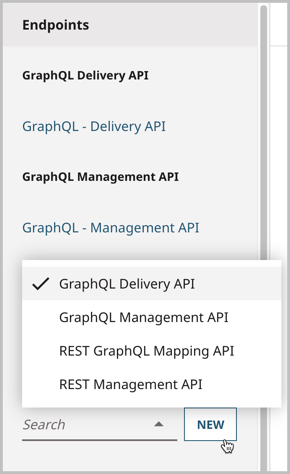
- In the left rail, from the Endpoints list and under the Create menu, select GraphQL Delivery API, then click New. See the image below.

Naming the endpoint and select its version
Now you will name the endpoint, after which Brightspot automatically generates a draft of the endpoint's path. Endpoint paths are tied to Brightspot's permalink system and associated with the Global site, which ensures that an endpoint's path is not a duplicate. If a duplicate exists upon trying to save the endpoint, Brightspot indicates this in an error message and prevents you from saving. The Path field is editable so that you may give it a unique value if needed.
- In the Name field, enter
Hello Worldas the name for the endpoint. This is an internal name used to reference the endpoint in the Endpoints list in the left rail. In the Path field, verify that
/graphql/delivery/hello-worldis automatically generated from the Name field. Your edit page looks similar to the following image.
- From the Version list, select 1. Depending on your version of Brightspot, this may be the only available option in the list and selected by default.

Configuring schema settings
In this step, you will configure the endpoint's schema settings.
- From the Schema Settings list, select Recordable.
- From the Query Entry Types list, select Article. By doing this, you are restricting the endpoint to only fetching articles, which for this tutorial is part of the requirements.
- In the Default Query Limit and Max Query Limit fields, retain the default values (
10and100, respectively). - Your edit page looks similar to the following image.

Restricting access to API key
Now, you will require an API key for a client to hit the endpoint. Though this step implies the existence of an API client, you will not create one until later in this tutorial.
- From the Access list, select API Key Required.
Click Save.
NoteAfter saving the endpoint, the Paths field at the bottom of this edit form displays the same path as the one auto-generated from the Name field; the Paths field exists so that you know the endpoint path even when the endpoint is created programatically. For details, see Tutorial: Programmatically creating a GraphQL endpoint for an admin team.
Verifying that the endpoint is working via the Advanced tab
At this point, you must validate that the endpoint is working. You will do this by querying the endpoint, then checking the load result in the Advanced tab. On this tab, you see information about the schema load result, including its status, duration, and any exceptions. It also displays the schema version history.
- Combining your back-end environment's domain with the endpoint path, query the endpoint in your browser.
- Back on the endpoint edit page, in the top right of the screen, click , then click Advanced.
- Click Schema Load Result.
- In the Status field, confirm that the status is
Done. - In the Load Duration field, ensure the load time is acceptable.
- In the Schema Load Exception field, check for any exceptions thrown by the endpoint and rectify as necessary.NoteThe Schema Load Exception field is dynamically generated, making it especially useful when, for example, creating a management API endpoint that includes two query entry types that share the same name. Information about dynamic disambiguation, including new names generated for them, appears in in this field.
- Under Schema Versions, note the change log for each revision of the schema. To view more detailed information, click .
You have now created a basic GraphQL Delivery API endpoint that requires an API key.
Step 3: Expanding access to the API endpoint
You now have created a GraphQL delivery API endpoint that requires an API key to fetch articles; however, in this step, you will expand the endpoint's access so that it no longer requires an API key to fetch articles, but is still restricted to fetching articles only from a specific site. You do this by adjusting the existing API client and assigning site permissions to it. The end result will be an API that can only fetch articles from a site of your choosing.
In this step, you will:
- Create an API client in Brightspot and assign site permissions to it.
- Change the endpoint's access and slot in the API client as the endpoint's attributional client.
- Validate that the endpoint is configured correctly using the GraphQL explorer.
Creating new API client and assigning site permissions to it
Begin by initiating the creation process of an API client.
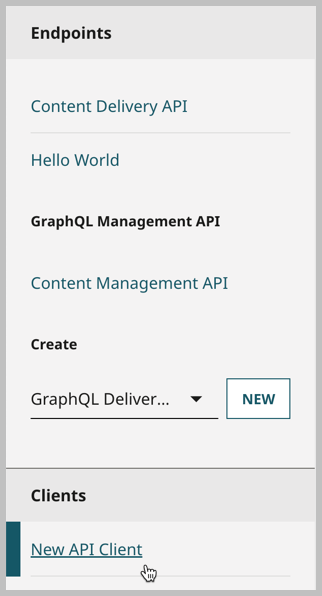
In the left rail, from the Clients list, click New API Client.
- In the Name field, enter
Example App. - Under Endpoints, click , then select the Hello World endpoint.NoteTo see a list of clients associated with a given endpoint, refer to the Clients field at the bottom of the endpoint's edit page.
- Under Permissions, click , then do the following:
- Under Sites, click to open a list of sites.
- Select the site to which you want to limit requests made from this API client. Your content edit form should look like the following image.


- Repeat steps 4a–4b to add additional sites as necessary.
NoteBy default, only site permissions are available; however, permissions can be extended to other use cases as well. - Click Save.


Assigning the API client as the attributional client for your endpoint
- In the left rail, from the Endpoints list, click Hello World.
- Under the Access field, select Anyone.
From the Attributional Client list, select the API client you created, Example App.
NoteThe Attributional Client field is an optional field that serves two purposes:- When retrieving analytics data about requests made to the endpoint, Brightspot attributes these requests to the attributional client in this field.
- Permissions set to the attributional client in this field are applied to all requests made to this endpoint.
- Click Save.
Verifying the API endpoint is working via GraphQL Explorer
At this point, you must validate that the site-restricted endpoint is working. You will do this by opening the GraphQL explorer and querying the endpoint, ensuring that it only returns articles from the site you specified for the API client.
- In the top right of the screen, click , then click GraphQL Explorer.
- In the left panel, build the following query:
- Expand
Article. - Expand
model:. - Click
id:. Enter the UUID of the first article you created in Step 1.
query MyQuery { Article(model: {id: ""}) }-
Insert the UUID of the first article you created in step 1.
-
- Expand
- In the middle panel, execute the query:
- Click the execute button to run the query. Your result should look similar to the following code snippet.
{ "data": { "Article": { "subHeadline": null, "headline": "GraphQL-related article 1", "priority": null, "changeFrequency": null, "_id": "" } } }-
The result returns the name of the first article you created in step 1 of this tutorial.
-
Contains the UUID of the first article you created in step 1 of this tutorial.
-
- Click the execute button to run the query. Your result should look similar to the following code snippet.
- In the middle panel, make the following adjustments to the query, then execute the query again:
- In line 2, replace the UUID for the first article you created with the UUID of the second article you created.
- Execute the query. Your result looks similar to the following code snippet.
{ "data": { "Article": null } }-
The result returns null, indicating that you are not able to query for an article created in a site to which the API client does not have permission.
-
You have now verified that the endpoint is configured correctly. Additionally, you have verified that the endpoint is restricted to only fetching articles from the site you specified in the API client's permissions.
From the Query Panel:
- Minify Query—Condenses the size of the query to a single line that you can scroll.
- Prettify Query—Reverts the query back to its more formatted version.
- Copy Query—Copies the query for use elsewhere.
- Toggle Wrap Query—Wraps a minified query around to the next line, avoiding scrolling.
- Toggle Deprecated Fields—Hides fields that have been deprecated.
From the Left Toolbar:
- Show History—Shows a history of the queries you have run.
- Favorite Star—When viewing query history, allows you to favorite a query you have run.
Step 4: Opening access to the endpoint completely
Now, you will completely open up access to the endpoint.
As part of this effort, you will:
- Open access to the endpoint
- Validate that the endpoint is working correctly using the GraphQL explorer
Completely opening access to the endpoint
In this step, you will be opening access to the endpoint so that there are no restrictions of who can access it.
- Click > Admin > APIs.
- In the left rail, from the Endpoints list, select Hello World.
- In the Attributional Client field, click to remove Example App as the attributional client.
- Toggle on Allow Introspection Queries.NoteWith a truly open-access API endpoint, you have the option of enabling introspection queries by toggling on Allow Introspection Queries. You can only enable introspection queries on production servers. If the server is not marked as a production server, this toggle has no effect.
Brightspot recommends only toggling on this setting if your API is meant for public consumption. - Click Save.
Validating that access is completely open via the GraphQL Explorer
Now that you have opened access to the endpoint completely, you will verify that you configured it correctly. You will do this by using the GraphQL explorer to query for the second article you made in Step 1 of this tutorial.
- In the top right of the screen, click , then click GraphQL Explorer.
- In the left panel, build the following query:
- Expand
Article. - Expand
model:. - Click
id:. - Enter the UUID of the first article you created in Step 1.
query MyQuery { Article(model: {id: ""}) }-
Insert the UUID of the first article you created in step 1.
-
- Expand
- In the middle panel, execute the query:
- Click the execute button to run the query. Your result looks similar to the following code snippet.
{ "data": { "Article": { "subHeadline": null, "headline": "GraphQL-related article 1", "priority": null, "changeFrequency": null, "_id": "" } } }-
The result returns the name of the first article you created in step 1 of this tutorial.
-
Contains the UUID of the first article you created in step 1 of this tutorial.
-
- Click the execute button to run the query. Your result looks similar to the following code snippet.
- In the middle panel, make the following adjustments to the query, then execute the query again:
- In line 2, replace the UUID for the first article you created with the UUID of the second article you created.
- Execute the query. Your result looks similar to the following code snippet.
{ "data": { "Article": { "subHeadline": null, "headline": "GraphQL-related article 2", "priority": null, "changeFrequency": null, "_id": "" } } }-
The result returns the name of the second article you created in step 1, indicating that the site restrictions are no longer in place.
-
You have now verified that the endpoint is configured correctly. Additionally, you have verified that the endpoint has no restrictions.
Step 5: Checking endpoint analytics
Now that you have created and queried a GraphQL delivery API endpoint, you can view its analytics.
Checking endpoint analytics via the Analytics tab
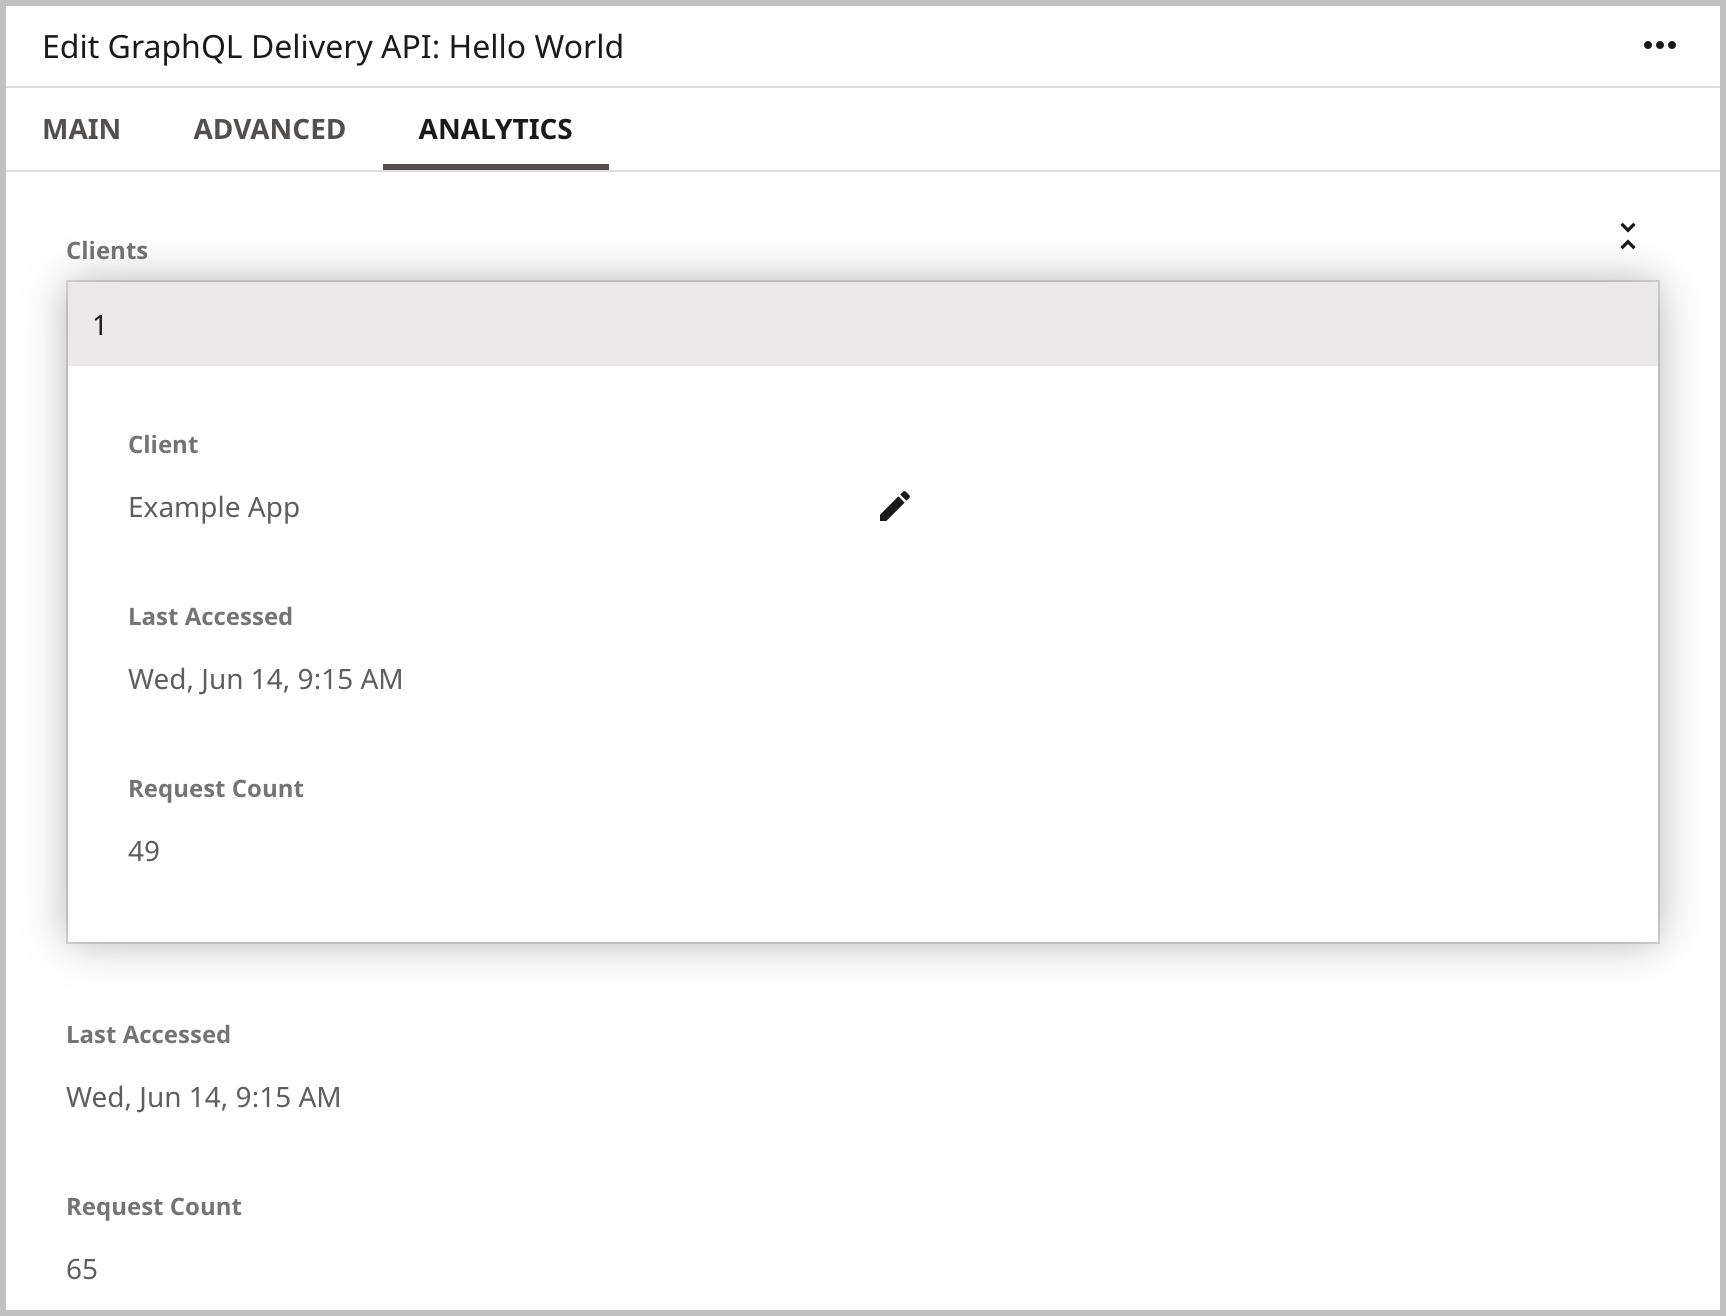
Once requests are made against the endpoint, you will verify that it is working correctly via the Analytics tab. On this tab, you can view data about the requests, including a subset of data exclusive to the client Example App that you configured as a result of this tutorial.
- Click > Admin > APIs.
- In the left rail, from the Endpoints list, select the Hello World endpoint you created.
- In the top right of the screen, click , then click Analytics.
- In the Clients field, view a client-specific breakdown of when the endpoint was last accessed by the client
Example App, as well as how many requests this client made. - In the Last Accessed field, note the last time a request was made against the endpoint.NoteThe time displayed in this field is always set to be in five-minute increments. The final digit always ends in either
0or5. In the Request Count field, you can see the number of requests made against the endpoint overall. The image below is an example of what this tab may look like for you.


You have now viewed analytics on the endpoint you created as a result of this tutorial.