Creating or modifying a workflow
You can create different workflows for different content types. For example, the workflow for an article can include first draft, final draft, and publication. The workflow for an image can include initial upload, cropping, and adding metadata.
To create a workflow:
- Click > Admin > Workflows.
- In the Name field, type a name for the workflow.
- In the Sites field, add sites to which the workflow applies (or leave blank to apply the workflow to all sites). For information about creating sites, see Creating a site.
- In the Content Types field, select the content types to which this workflow applies.
- Toggle on Comment Required if you would like to require editors to enter an explanatory comment when transitioning an asset to a new status in the workflow.
- In the Actions field, do the following:
- Click Add Status.
- Type the name of the status.
- If this is the first status that you created, click Add Transition in the status box New. Otherwise, click Add Transition in the previous status box that you created.
- Drag your mouse over the status box you created in step 6a.
In the transition box, type a name for the transition.
TipMultiple transitions from a workflow status appear in alphanumeric order in the Workflow widget, which may be different from the intuitive workflow order. To ensure the transitions appear in an intuitive workflow order, start a transition’s name with a numeral. For more information, see Customizing the transition order in the Workflow widget.
- Repeat steps 6a–6e to add additional statuses and transitions. Ensure you have a transition to the status Published.
- Click Save.
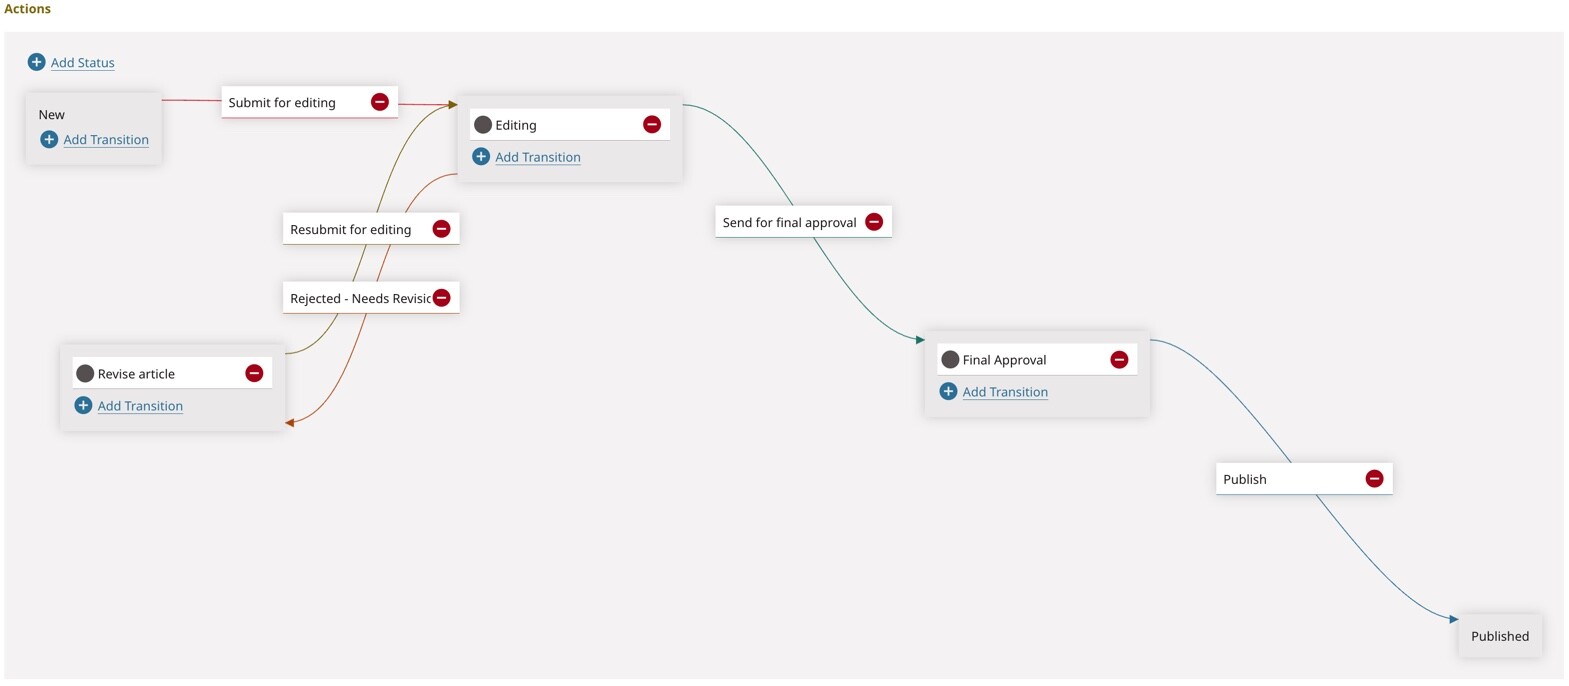
The following illustration is an example of a simple workflow for an article.


Sample Workflow for articles
Referring to the previous illlustration—
- After creating a new article, the editor must send it to the Editing status.
- After edting an article, the editor can send it to the Revise article status or to the Final Approval status.
- After revising an article, the editor must send it back to Editing status.
- After final approval, the editor must click Publish to publish the article.
After you save a workflow—
- Brightspot lists the workflow in the Workflows list.
- Each time you create a new asset for the workflow’s content type, the Editorial Toolbar displays the workflow status and a Workflow button.
- Brightspot saves a draft for each status in the workflow. You can retrieve those drafts from the Version History widget. (In versions prior to v4.8, this widget is named the Revisions widget).
- The asset’s current status appears in the Recent Activity and Unpublished Drafts widgets (see Standard dashboard and widgets).
- Assets created before a workflow was created automatically enter the workflow—unless they are published. For example, if a workflow is created for blogs on your site, all of the blogs that have not been published will have the Workflow button instead of the Publish button present on their content edit forms. See Moving assets through a workflow for more information.
To modify a workflow:
- Click > Admin > Workflows.
- Select the workflow you want to modify from the Workflows widget.
- Use the field descriptions above to make the changes needed to the workflow.NoteBrightspot displays a warning message if you attempt to remove a workflow status that has assets assigned to it. If you continue and remove the status, all assets in the status that was removed will revert to the previous status in the workflow. For example, if your workflow is
New–Draft–Review–Revise–Publish, and you decide to remove theRevisestatus, all assets in that status are placed back in theReviewstatus. - Click Save.
In addition to modifying the fields above, there are a few other modifications you can make to workflows:
- For information on adding color codes to your statuses, see Adding color codes to workflow statuses.
- To archive a workflow, see Archiving a workflow.
- To restore an archived workflow, see Restoring an archived workflow.
- To permanently delete a workflow, see Deleting a workflow.
In addition to modifying a workflow, you can:
- Check on the details of an asset's status as it transitions through a workflow; see Progression of an asset through states.
- View the history of workflow modifications; see Viewing the workflow's history.
Previous Topic
Workflow administration
Next Topic
Adding color codes to workflow statuses